> For the complete documentation index, see [llms.txt](https://docs.chirpwireless.io/llms.txt). Markdown versions of documentation pages are available by appending `.md` to page URLs; this page is available as [Markdown](https://docs.chirpwireless.io/devices/pretend-sensors.md).
# Pretend Sensors
Make a pretend sensor in Chirp that invents its own readings, so your dashboards and alerts are ready before the real one arrives.
You have ordered a leak sensor. It arrives on Thursday. A pretend sensor lets you get everything ready in the meantime — lay out your dashboard, write your alerts, and watch them actually go off — days before anything turns up in the post.
A pretend sensor behaves like a real one in every way that matters. It appears in your sensor list, it reports on a schedule, its readings land on your dashboards, and your alerts fire off them. The only difference is where the numbers come from: Chirp makes them up instead of a device sending them.
## What do I need before I create a pretend sensor?
You need an **Emulator** connection. It takes two clicks and there is nothing to fill in — no account to link, no keys to copy. See [Emulator Connector](/connectors/emulator-connector.md).
You also need permission to edit devices and room in your subscription for another digital device. No physical sensor or gateway is needed.
## How do I make a pretend sensor?
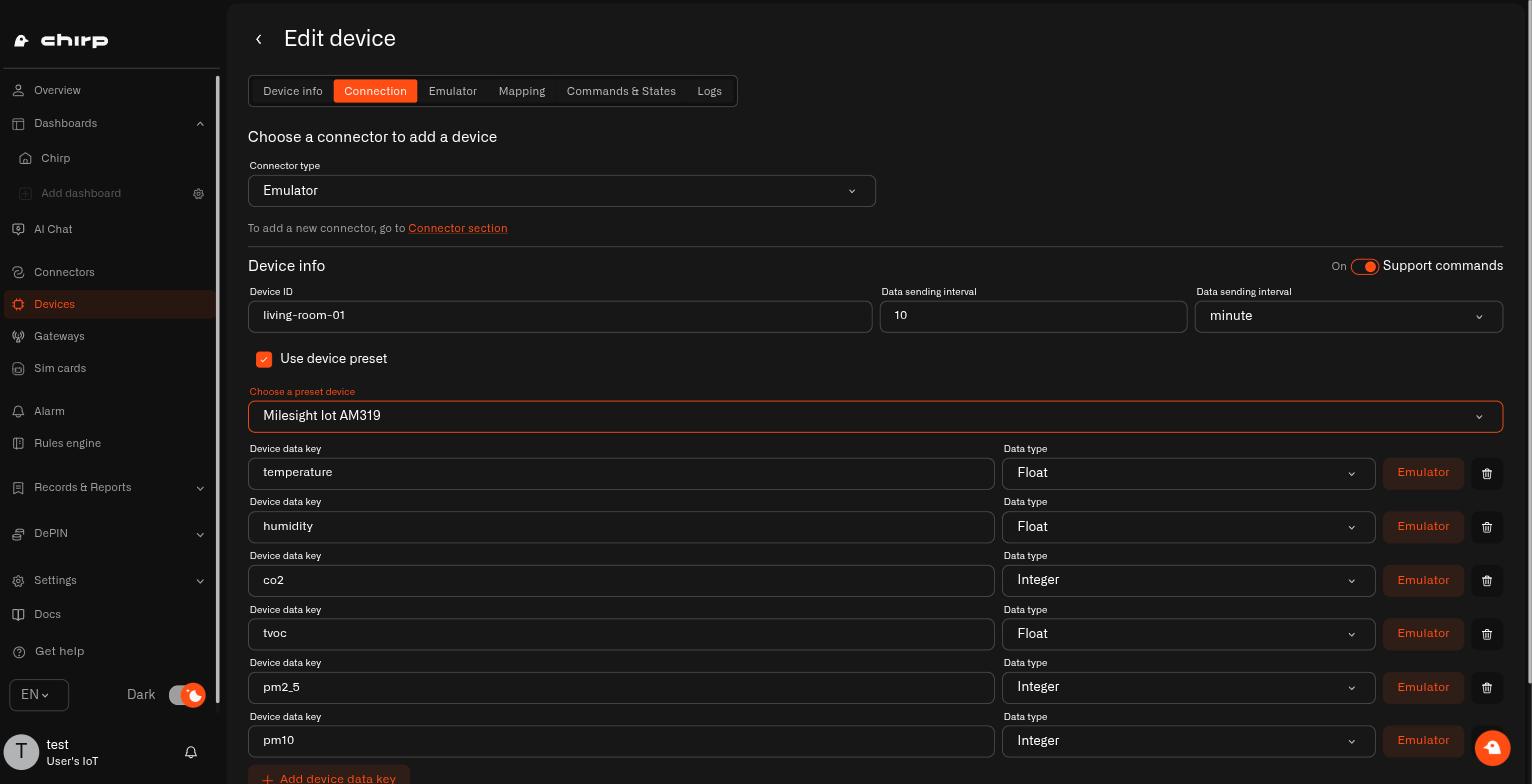
Add a sensor as usual, then on its **Connection** tab choose **Emulator**. You will be asked for:
* **Device ID** — a name of your own, so you can tell your pretend sensors apart. Up to 64 characters, using letters, numbers, spaces, dots, underscores and dashes. It has to be unique across all of Chirp — not just your home — so something like `garage-temp-01` will be accepted where `sensor1` may already be taken.
* **How often it reports** — a number and a unit, like every 10 minutes. Match roughly what the real sensor will do, so your alerts behave realistically. Unlike a real sensor, this genuinely is the schedule — Chirp sends on it.
* **Support commands** — switch this on if you want to practise turning the thing on and off, not just reading from it. See [Controlling Your Devices](/devices/commands.md).
* **Use device preset** — the quick way. Pick a real sensor model and Chirp fills in the readings that model actually sends.
### Starting from a real sensor model
Tick **Use device preset** and pick from the list of real sensor models, and you get that model's genuine set of readings — a multi-sensor gives you temperature, humidity, CO2 and air quality, each with the right kind of value. It saves typing, and it means the names on your dashboard are the ones the real sensor will use when it arrives.
Choose your preset before collecting readings. It replaces the current keys and reporting interval, and Chirp asks you to confirm if rows already exist. Saving the replacement can remove measurements you were using and their accessible history. Unticking **Use device preset** keeps the current settings; it does not undo that replacement.
### Or type the readings yourself
Use **Add device data key** and give each reading a name — `temperature`, `humidity`, whatever you like — and say what kind of value it is. Pick **Float** for anything with a decimal point. For **Integer**, enter a whole number: the manual-value field rejects `1.5`. Float inputs accept decimals with a dot, not a comma. See [Data Templates](/devices/data-templates.md) for how value types work.
Setting up a pretend sensor on the Emulator connector.
## How do I choose how pretend readings behave?
Beside each key on **Connection**, click **Emulator**. The controls depend on the kind of reading:
* For a number, set **From** and **To**, the value it **Holds around**, and **Variability**. The lower limit must be below the upper limit, and the usual value must sit between them.
* For true/false, choose a **Default state** and how often it changes with **Activity**: Rare, Occasional, or Frequent.
* For text, enter **Values & weights** and adjust **Stickiness**. Add between 1 and 32 values, no longer than 64 characters each. Their weights must be positive whole numbers adding up to 100%.
Apply your choices and save the device. For a leak sensor, use false as the usual state and Rare activity; for room temperature, choose a realistic temperature range. Set **Data sending interval** in whole minutes, hours, or days, between one minute and one day.
One pretend sensor can contain up to **50 readings** and **20 preset commands**. Use nonempty data keys no longer than **256 characters**; a manually pinned text value has the same length limit.
## What does the Mapping tab do for a pretend sensor?
Because a pretend sensor's readings are defined in its own settings, the **Mapping** tab simply mirrors them, and it keeps things tidy for you. If you delete a row there, that reading is removed from the sensor and stays gone after you save; it doesn't pop back as a stray duplicate. The data-key columns are view-only, and you won't find **Add new metric** buttons, because a brand-new reading needs its behavior settings, which live on **Connection**. To add one, use **Add device data key** there and come back to **Mapping** afterward. Switching a row to a different metric replaces the old one rather than leaving a second copy behind.
## How do I make a pretend sensor send something?
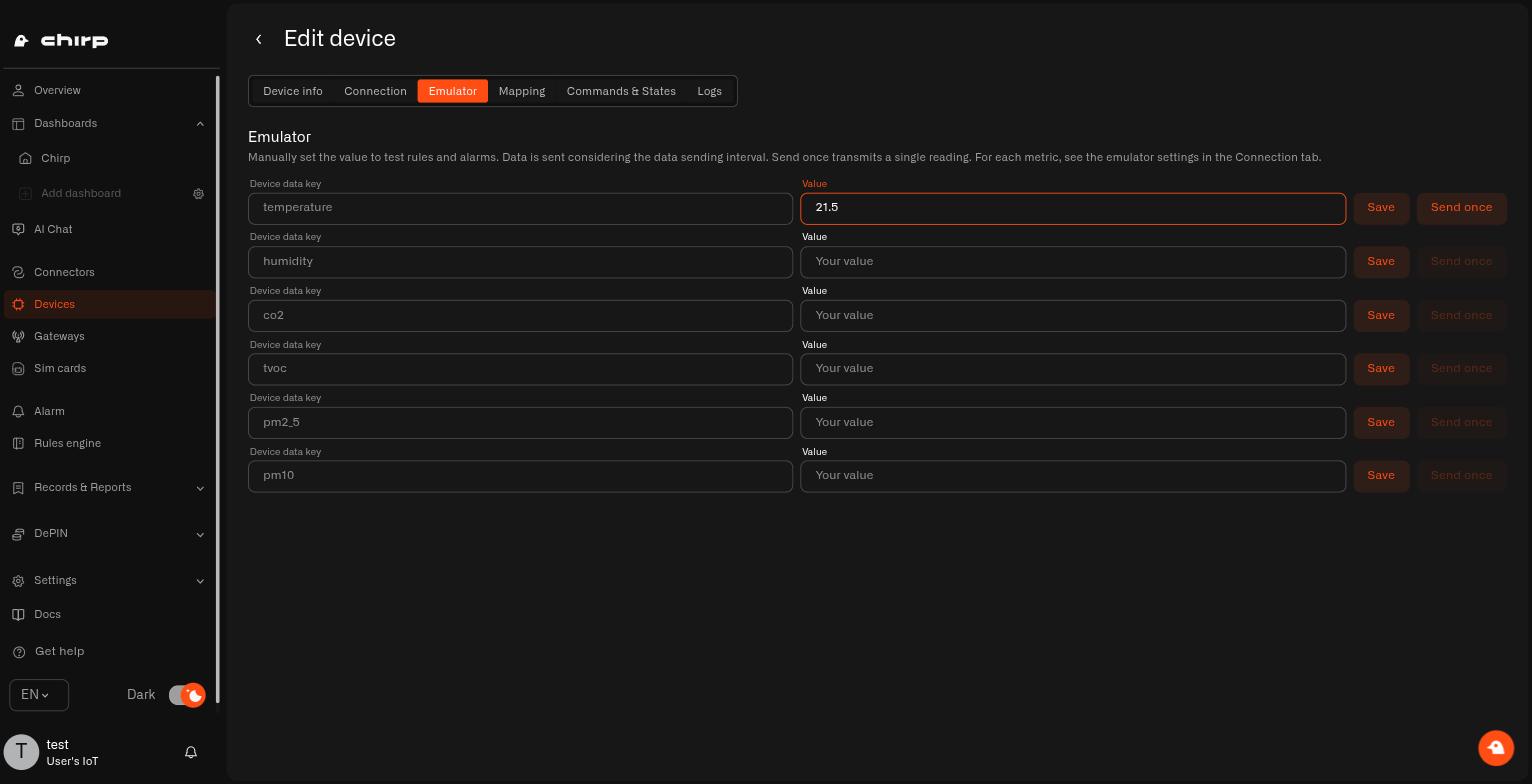
Open the sensor's **Emulator** tab and you will see each reading with a box next to it:
* **Save** parks a value there. The sensor keeps reporting it, which is how you hold the basement at 85% humidity while you check your damp alert behaves.
* **Send once** fires a single reading and goes back to normal. This is the one for "does my alert actually work?"
To let Chirp generate values again, empty the pinned value and press **Save**. If the input is a dropdown, select **No manual value** first. Save a newly added reading on the device before using its value controls.
Sending a value counts as changing something, so a household member with view-only access can watch a pretend sensor but cannot push readings into it.
A pretend sensor offers **No verification** for commands. It can exercise your setup, but it does not confirm delivery to real hardware. Automations triggered by its readings can still operate other connected devices, so check their actions before sending generated values.
## What do I do when the real sensor arrives?
Open the sensor, go to its **Connection** tab, and change it from **Emulator** to the real connection — then enter the details that came with it.
The same digital device and measurement identities remain available to your dashboards and automations. Check that the new hardware fields feed those measurements and review any commands before using them with the replacement.
You can go the other way too, putting a real sensor back on the emulator for a moment if you want to test something without waiting for the house to cooperate.
### Know which readings were generated
Switching to real hardware keeps the digital device and its existing measurements. Earlier generated readings remain part of their history, so note when the actual sensor or tracker starts reporting. Use a separate pretend device if you want the real device's history to contain observations only.
After the change, check the source fields and the time of the latest reading. For a broken tracker that you are replacing with another tracker, follow [Sensor Details](/devices/sensor-details.md#how-do-i-replace-my-cars-tracker).
## How do I copy a pretend sensor?
The copy brings its pretend readings, generator settings, reporting interval, command-support setting, and preset commands with it. Enter a new **Device ID** and check its name before saving.
It is a new digital device with a fresh history. Use it to create another example, not to replace hardware on the original device. If saving the emulator setup fails after the device was created, reopen its **Connection** tab and save the corrected setup again.
See [Sensor Details](/devices/sensor-details.md).
## Can the assistant create a pretend sensor for me?
You do not have to do any of this by hand. Ask your [AI Assistant](/ai-assistant.md) to set up a pretend sensor and it will — choosing a model, creating the sensor, sending a reading to test an alert, and later taking it live onto your LoRaWAN connection. Asking the assistant to switch a pretend sensor to a tracker or an MQTT sensor is the one part it cannot do for you; do that yourself on the Connection tab.
> *"Make a pretend temperature sensor for the garage and send a reading of 2 degrees."*
## What's next
* [Tracking What Matters](/dashboards/tracking-what-matters.md) — build the dashboard you have been waiting to build
* [Alarms](/alarm.md) — and the alerts you can finally test properly
* [Adding Sensors](/devices/adding-sensors.md) — the normal way, once your hardware is here